(1) Files and Folders
Due: Tuesday, September 8
On this page, we’ll talk about files and folders, and get you set up with a basic folder structure and some files you’ll need.
Jungeun Seo made some video walkthroughs for tutorials 1 - 3. You can find them in the Tutorial Videos folder on the Google Drive. You’re not required to watch them, but you may find them helpful in combination with the written instructions. (Note: Any URLs shown in the videos have now changed. Follow the links on this site instead.)
1 Quick Summary
You’re not required to have prior experience in working with files and folders on a computer. We’ll talk about everything step by step on this page. But for this tutorial only, I’ve also provided a quick summary below. If you know what the following means, you can just do it and then skip to tutorial 2. But if you have any doubt, please read the full instructions below.
If you follow these steps and miss a detail, your future programming assignments may not run correctly. If in doubt, read the full guide.
- Download & Extract: EECS_183.zip to your local
Documentsfolder.- Mac users note: MacOS might never actually show you the
.zipfile, instead automatically extracting it. That’s fine. - Windows users must note: You need to use the local
Documentsfolder, not the OneDrive version that Windows often defaults to. To be certain, open theFile Explorerand pasteC:\Users\%username%\Documentsinto the address bar to get to the correctDocumentsfolder, or read the details below. - Windows users must note: Do you know the difference between extracting a zip file and just looking inside of it? If not, read the details below.
- Mac users note: MacOS might never actually show you the
- Visibility: Turn on “File name extensions” in your View settings. See the Windows instructions or the Mac instructions for details if needed.
- Shortcut: Create a Desktop shortcut/alias to the
EECS_183folder. Put the shortcut / alias on your desktop. See the Windows instructions or the Mac instructions for details if needed.
Did it work?
If you’re 100% certain you’ve completed the steps above, you can now skip to the next tutorial. If you have any doubts, no problem! Please read the details below.
2 Vocabulary
First, some vocabulary:
- A file is a basic unit of storage on a computing device, holding related data. For example, you might have a file representing some PowerPoint slides you downloaded for a class lecture, or a PDF file of instructions for an assignment.
- A folder, also known as a directory, is a container that can hold files, as well as additional folders. We use folders to organize our files so we can easily find them later, and keep related files together and unrelated files separate.
I’ve split this document into Windows and Mac sections. You only need to follow the steps corresponding to your computer.
3 Working with Files in Windows
3.1 Opening the File Explorer
If you’re using a Mac, skip down to the Mac section below.
If you look at the taskbar at the bottom of your screen, you should see an icon like this:  . Click it to open the File Explorer.
If you don’t see the icon, then first click the Windows menu (start menu) icon ( ) either at the bottom middle or bottom left of your screen. Type “file explorer” and click the
 File Explorer option that pops up, as shown below. 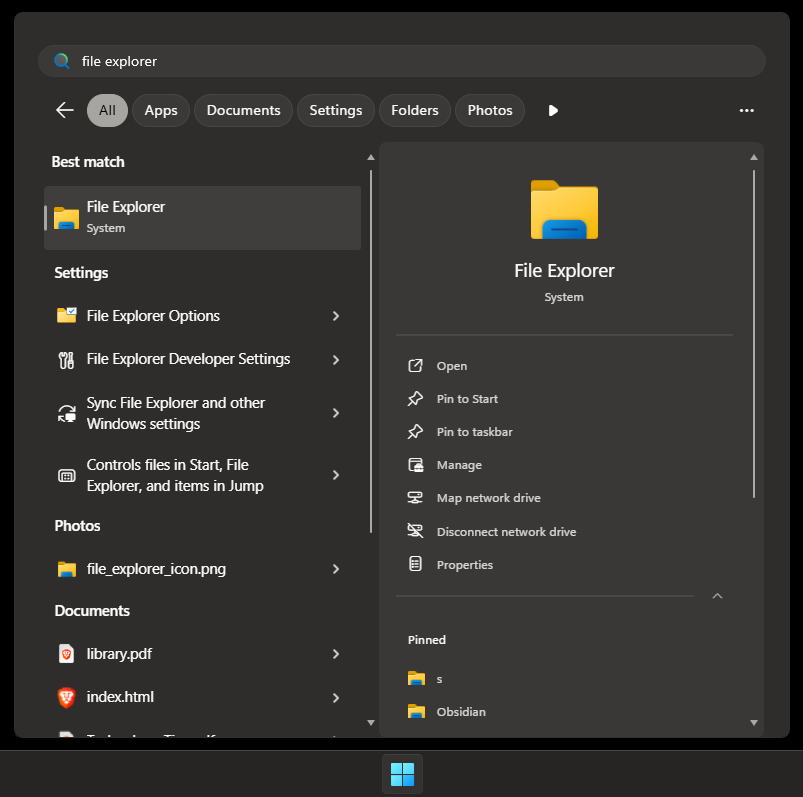
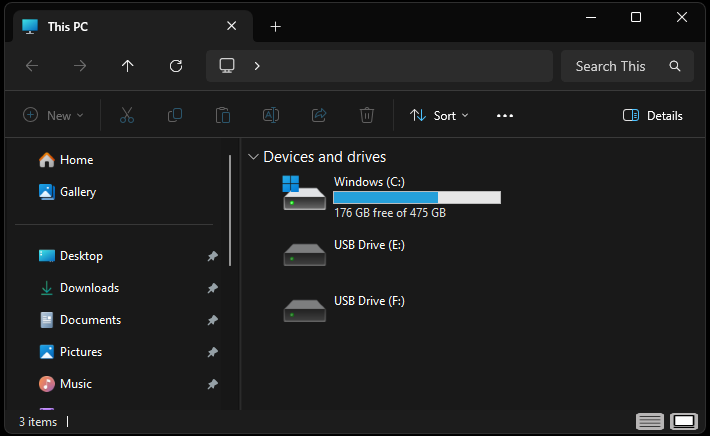
Upon opening the File Explorer, I see a window as shown below. Your File Explorer may show some different contents, and that’s ok.
3.2 Getting the Setup Files
A zip file is a special type of file that contains one or more files bundled together in a compressed format. This makes it easier to download and share multiple files at once. We’ll be using a zip file to provide you with some setup files for this course.
Download EECS_183.zip by clicking the link.
Depending on your browser settings, you might be asked where you want to save EECS_183.zip, or it might automatically download to your Downloads folder. If you are asked, save it to your Downloads folder for now (just to keep these instructions consistent).
3.3 Finding the Downloads Folder
With the
File Explorerwindow open, click in the address bar at the top middle of the window.- This looks similar to where you’d type a website address in a web browser.
- It probably says “This PC” or “Quick Access” or “Home”.
- In the image below, it’s the part that says
C:\Users\%username%\Downloads. - I am not talking about the search box to the right of the address bar, in the upper-right corner.
Click in that address bar, delete anything that’s there, and paste the following:
C:\Users\%username%\Downloads
In Windows, to copy text you must first highlight it by pressing and holding your mouse button while dragging along the text. Then press ctrl+C to copy the highlighted text. To paste text, click where you want to paste it, and then press ctrl+V.
That is, it should look like this before you hit
enter…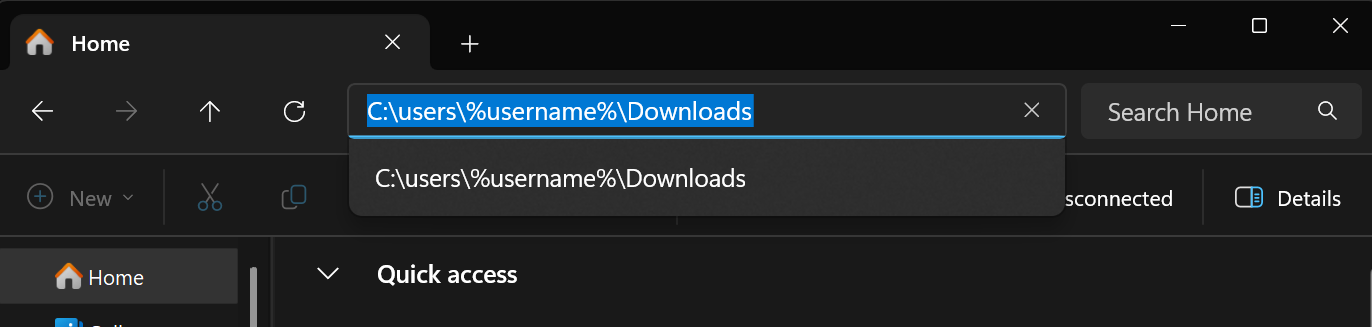
… and like this after you hit
enter:
3.4 Moving a Zip File from Downloads to Documents
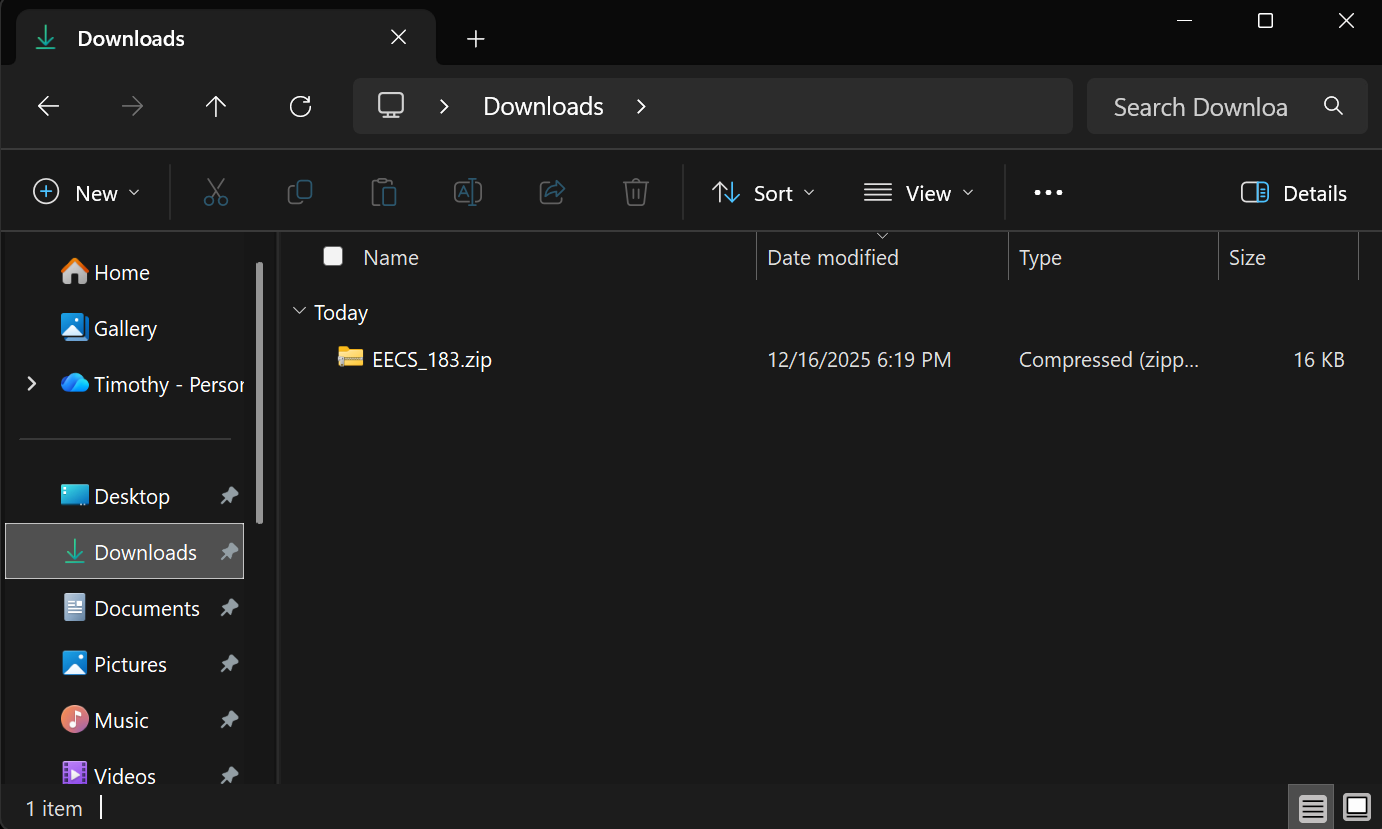
You should now see the file in your Downloads folder. The File Explorer should look something like this:
Do we want EECS_183.zip to stay in your Downloads folder? No! That would be like getting a package delivered to your doorstep and then keeping the item on your doorstep forever. We need to “bring it inside” and put it in its right place. Let’s move the EECS_183.zip file from your Downloads folder to your Documents folder:
Click once (not a double-click) on the
EECS_183.zipfile in theFile Explorerwindow to make sure that window is the active window.Press
ctrl+Nto open a new (second)File Explorerwindow.In the new window, navigate to your
Documentsfolder by clicking in the address bar, deleting anything that’s there, and pasting the following:C:\Users\%username%\DocumentsHit
enterafter pasting the text above, and you should then see this: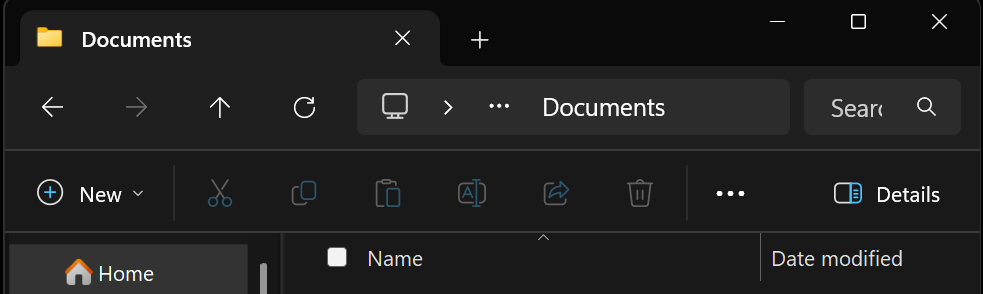
Make sure you find the Documents folder by following the steps above. If you do it in a different way, you might accidentally open the OneDrive version of the Documents folder, which won’t quite work right for this course!
Now go back to the first
File Explorerwindow – the one showing yourDownloadsfolder.Right-click on the
EECS_183.zipfile, and chooseCut: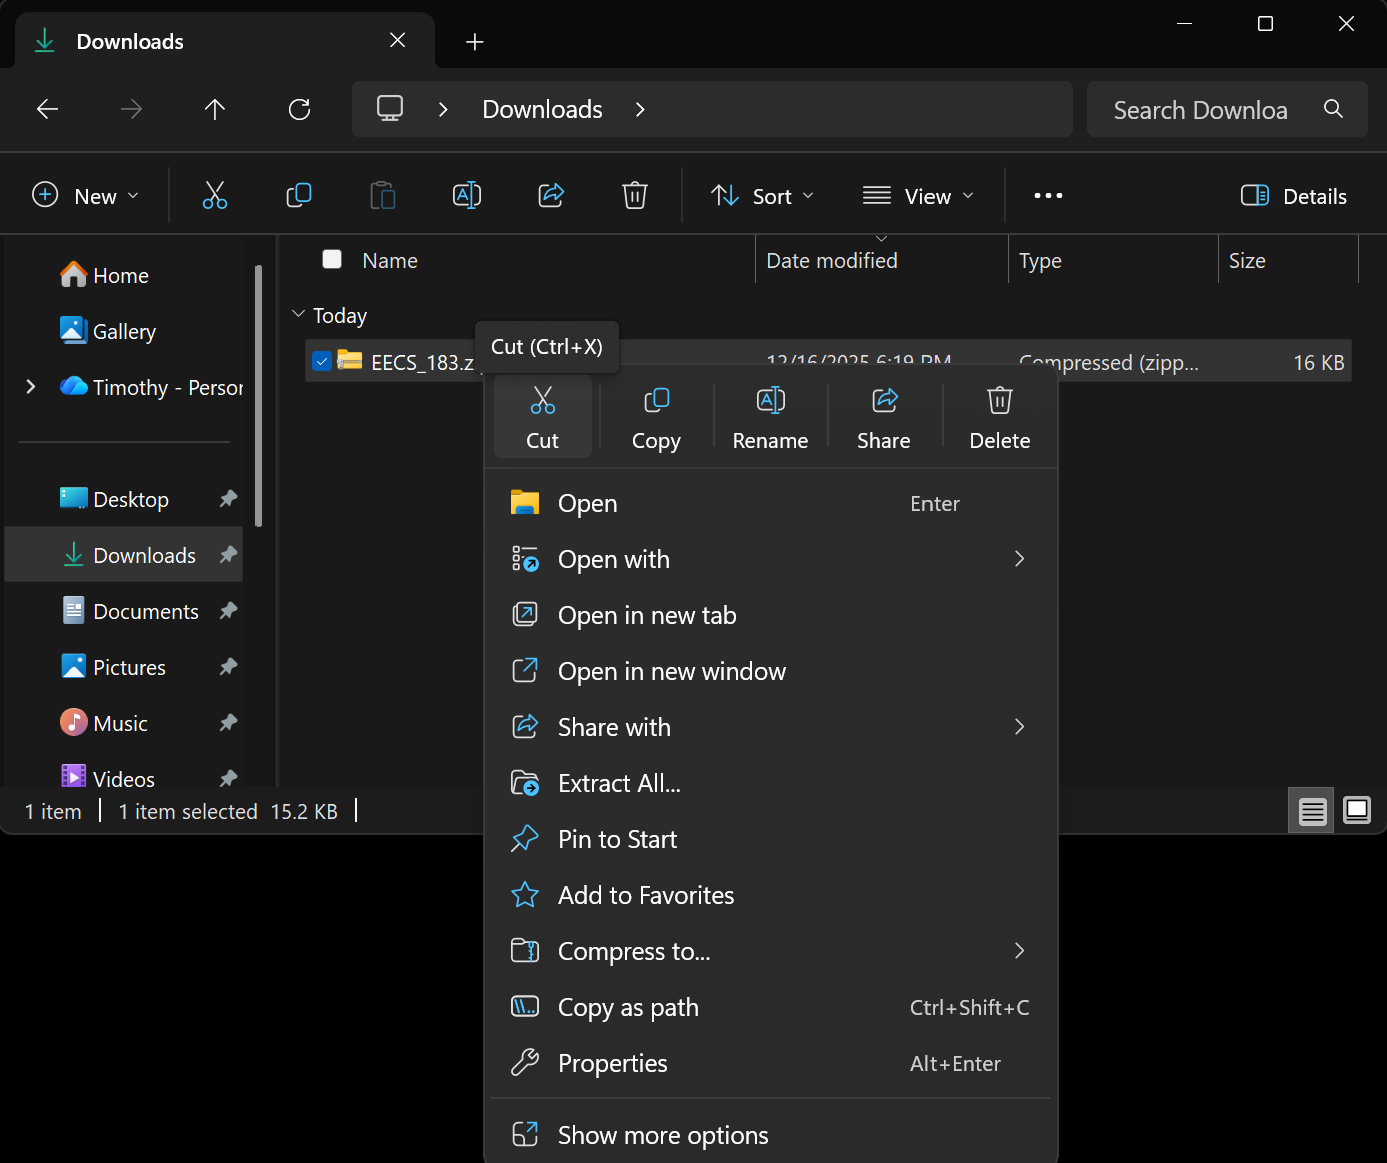 NoteWindows: How to right-click on a laptop touchpad (Click for details)
In Windows, to “right click” with a touchpad, click the touchpad with two fingers instead of just one.
Now go to the second
File Explorerwindow (the one showing yourDocumentsfolder).Right-click in an empty area of that window, and choose
Paste: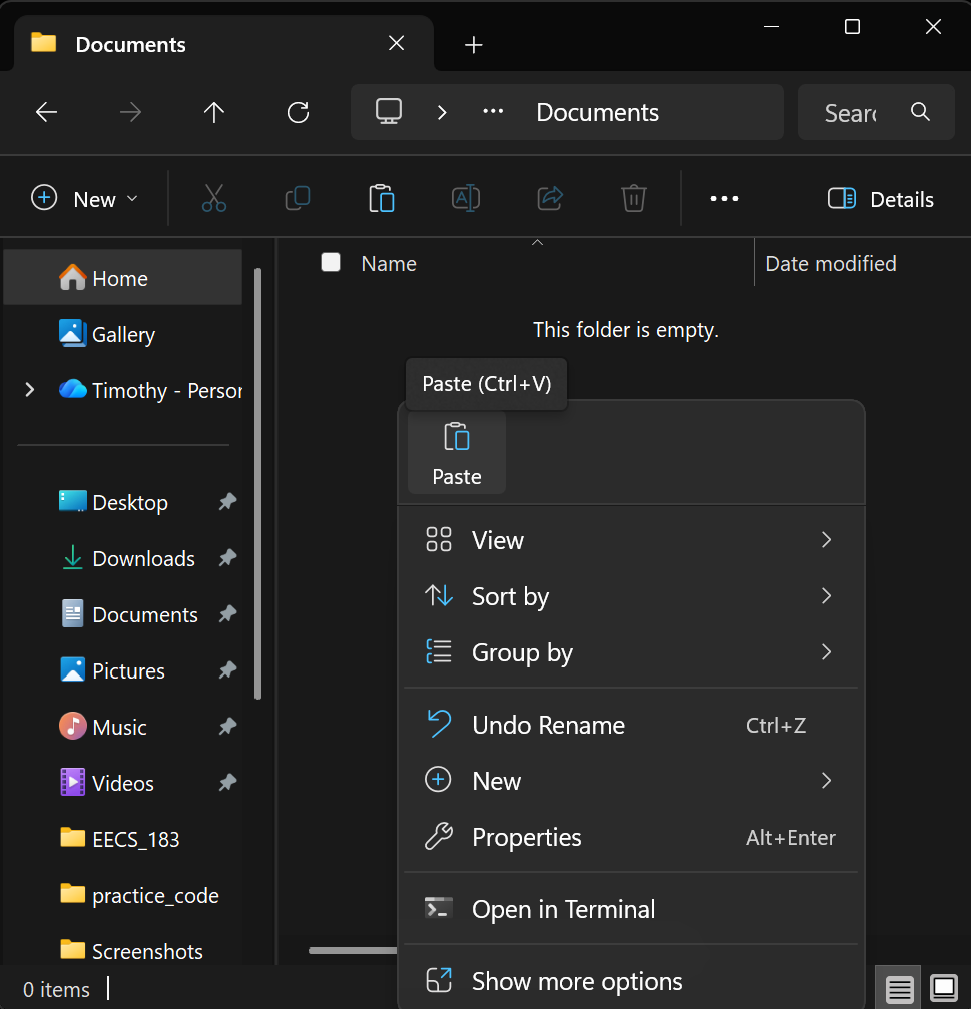 CautionIs there no Paste option? (Click for details)
First, make sure you’re clicking in a blank area of your explorer window, not on top of a file or folder.
If you still don’t see a paste option, you may not have successfully cut the file in the previous step. Go back to the
Downloadswindow, right-click on theEECS_183.zipfile again, and chooseCut. Then return to theDocumentswindow and right-click in a blank area to see if thePasteoption appears.Another step that might help is to close the
File Explorerwindow showing yourDocumentsfolder and open it again, again puttingC:\Users\%username%\Documentsin the address bar (not the search box).You should now see the
EECS_183.zipfile in yourDocumentsfolder!
3.5 Unzipping a Zip File
We need to unzip (extract) the contents of the EECS_183.zip file. To do this:
- Right-click on the
EECS_183.zipfile in yourDocumentsfolder.
Don’t ever bother double-clicking on a zip file. Instead, right-click as instructed here.
You might wonder: Can we just double-click on the zip file to access its contents? The short answer is: no. If you double-click, something different happens. Let me use an analogy:
Suppose you have a box taped shut, with toys inside. If you just pull up the lid a little bit to peek inside, you can see that there are toys in there. Maybe you could even touch one a bit. But you can’t freely play with the toy. To do that, you’d have to peel / cut off the tape, fully open the box, and take the toys out.
This is analogous to double-clicking on a zip versus extracting a zip (via right clicking). When you double click, you’re peeking inside, but you’re limited in what you can do. When you extract a zip, you’re unpacking it and pulling the files out so you can work with them fully. The latter is always what we want.
After right clicking on the
EECS_183.zipfile, in the pop-up menu, chooseExtract All...: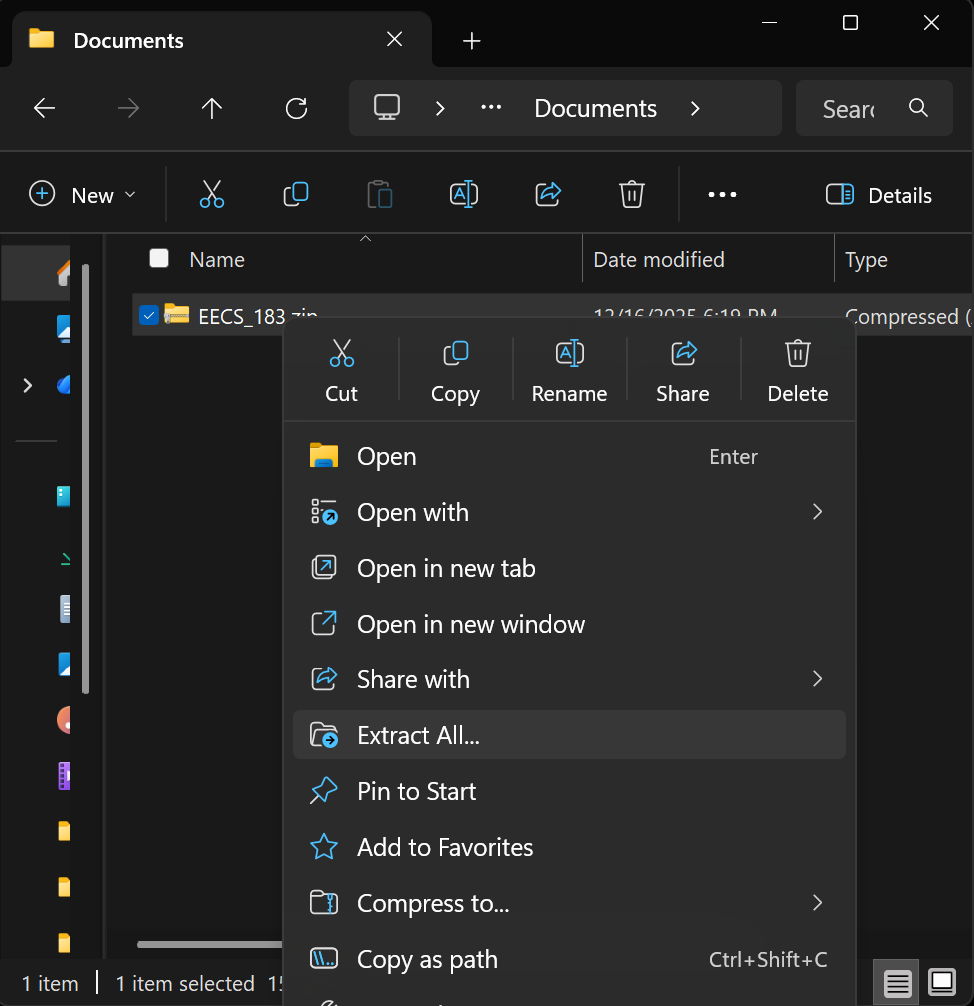
A window will pop up:
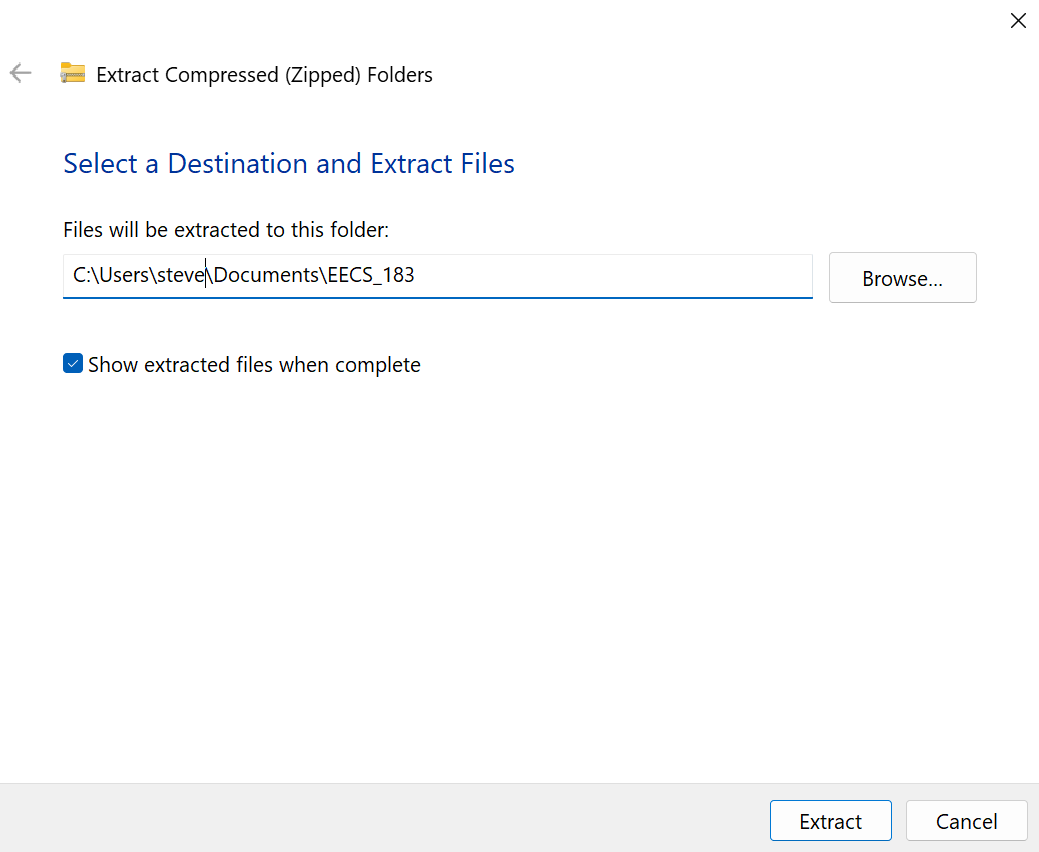
You don’t need to change any options. Just hit the
Extractbutton at the bottom.Yet another
File Explorerwindow should open up, showing you the contents of the unzipped folder (below). You should see alabsfolder, alecture_notesfolder, etc. (Some of the individual files listed below might be slightly different from what you have; that’s ok.)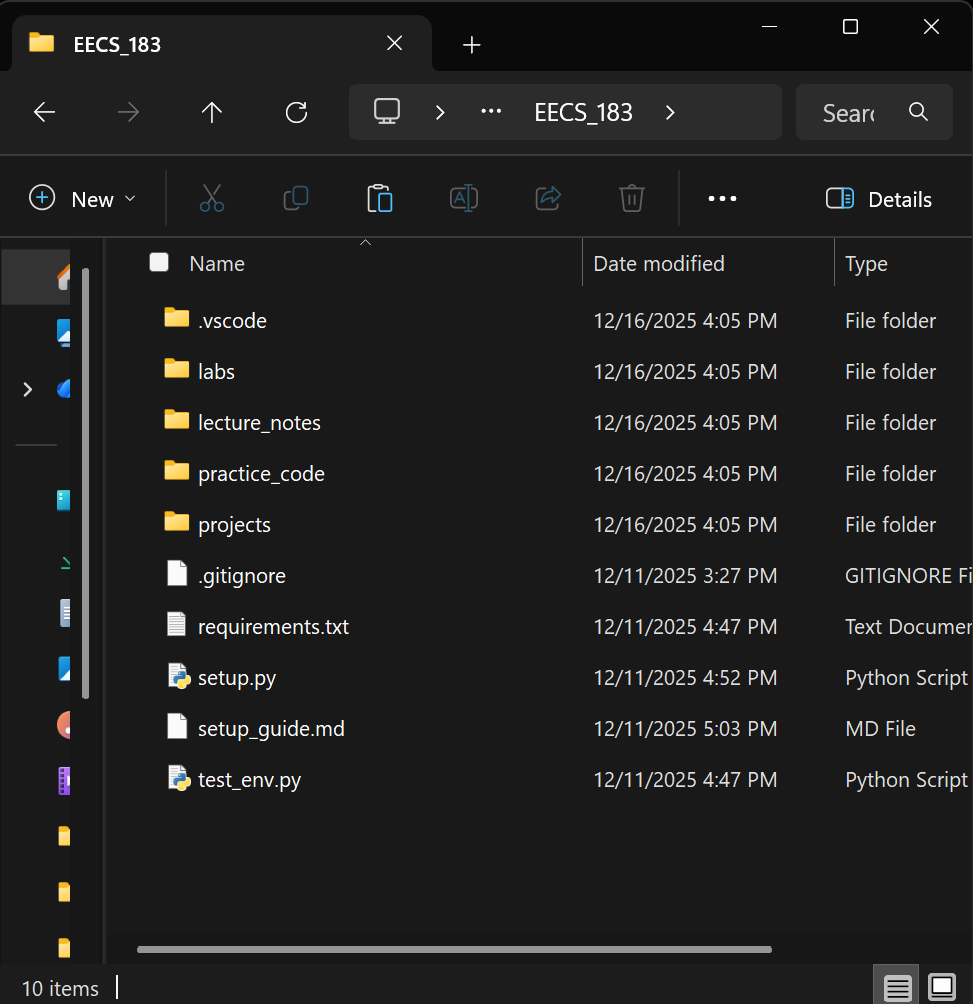
You now have access to the contents of the zip file! In particular, you have an EECS_183 folder inside your Documents folder. It has several folders in side to help you organize your files for this course. I’ve also included some “configuration” files that we’ll need soon.
3.6 Setting Up a Shortcut to Your EECS_183 Folder
Let’s make it super easy for you to access your EECS_183 folder in the future. We’ll make a shortcut to it on your desktop.
In
File Explorer, go to theDocumentsfolder again. Recall that you can do this by pasting the following in theFile Exploreraddress bar:C:\Users\%username%\DocumentsRight-click on your
EECS_183folder (not an empty space, and not the zip file).In the pop-up menu, choose
Show more optionsat the bottom: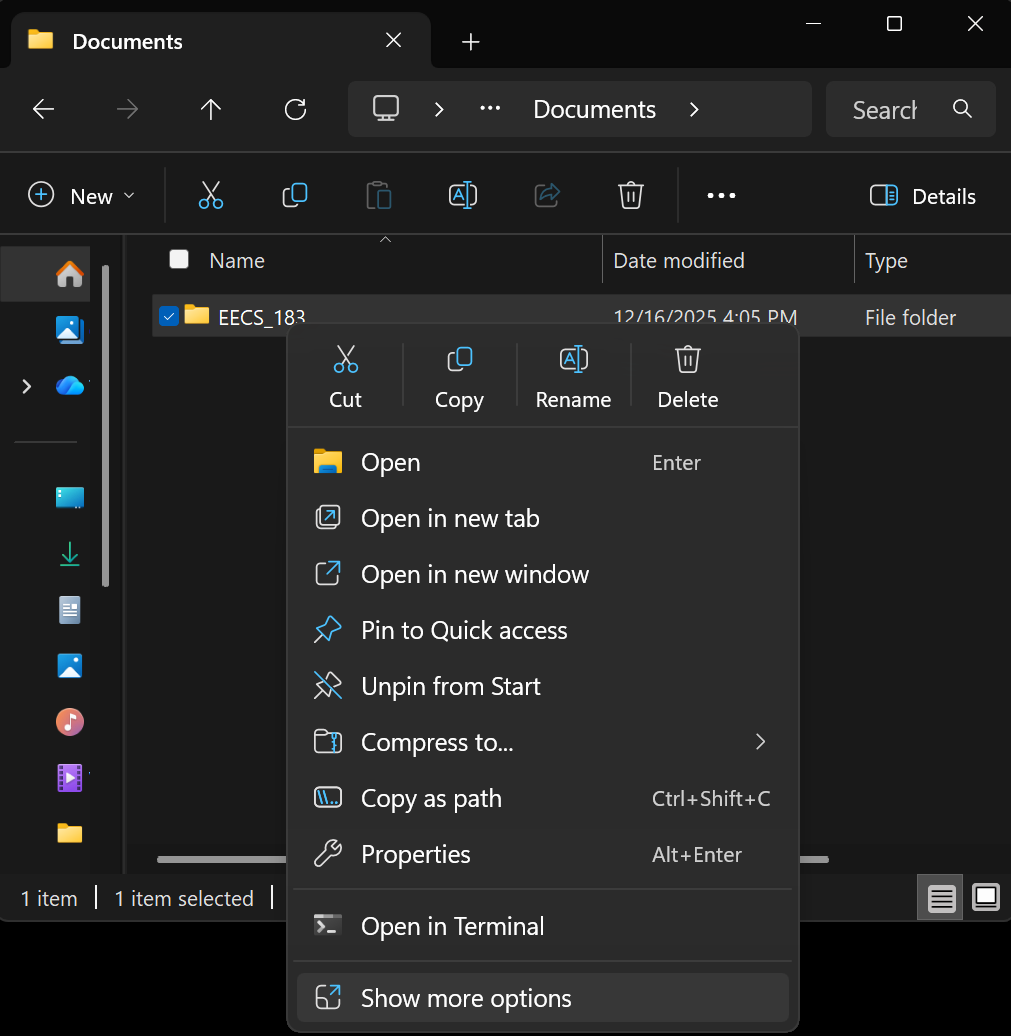
Then choose
Send to, and thenDesktop (create shortcut):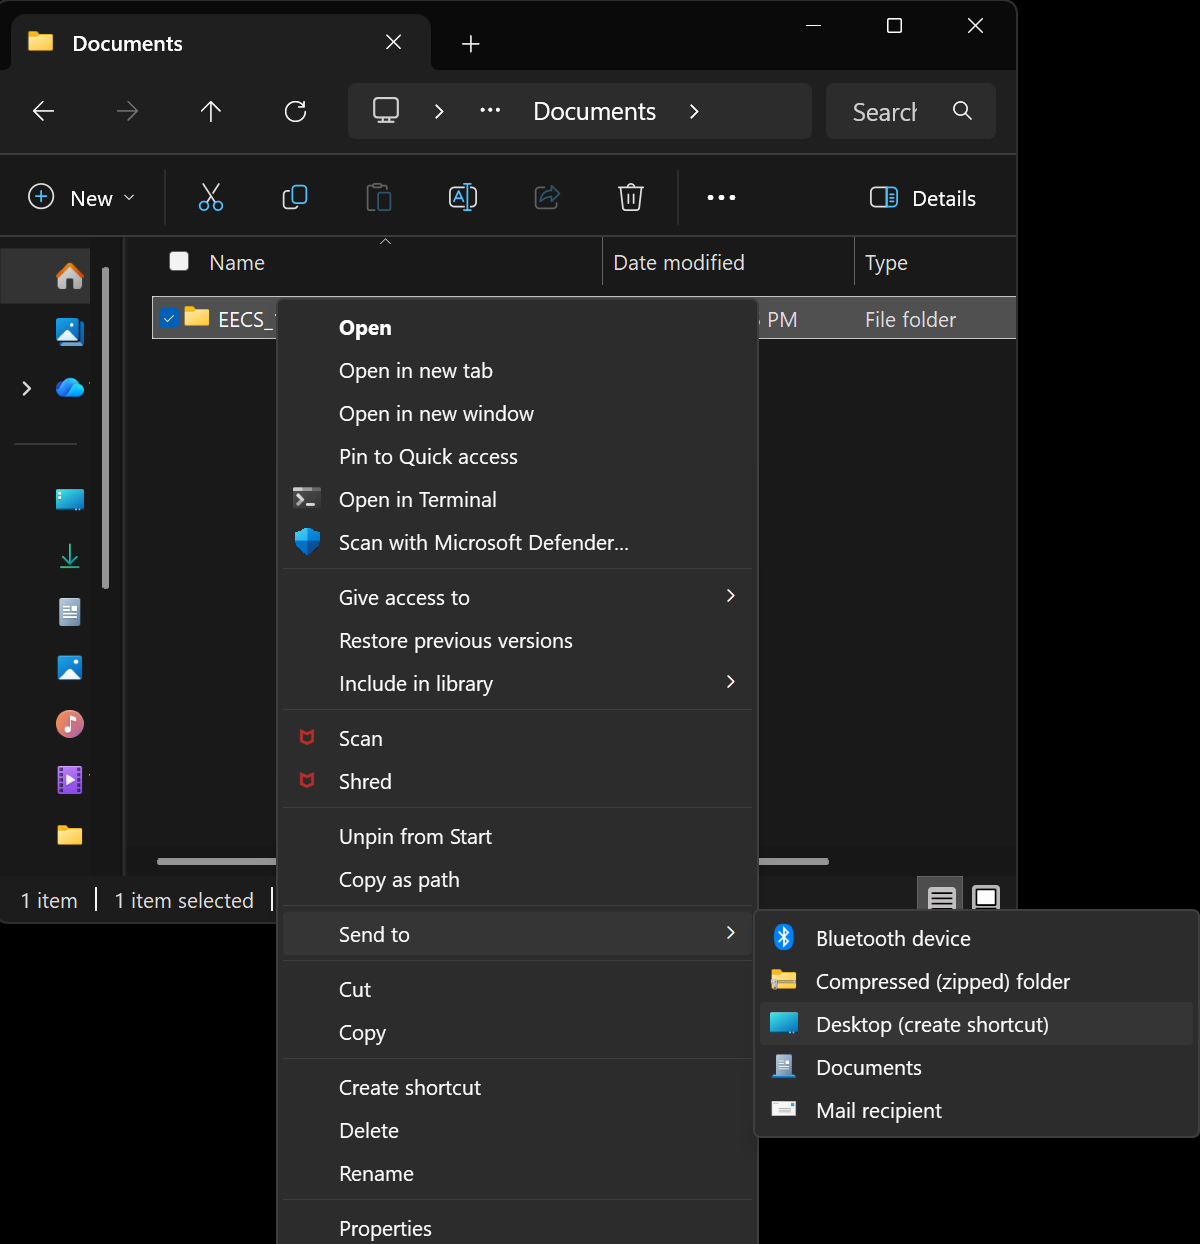
You should now see a new shortcut created on your desktop:
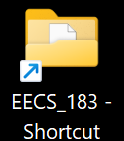
You can double-click on this shortcut anytime to open your EECS_183 folder.
3.7 Configuring the File Explorer View Options
We also need to tell Windows that we want to see more file information than is shown by default. Open up File Explorer again if you don’t already have it open. Maximize the window by hitting the square icon in the top-right corner of the window, if it’s not already maximized. (Ignore the pop-ups that appear when you hover over the square icon – just click on the square icon itself.) Click on the View drop-down menu in the upper-middle area, choose Show, and make sure you have a check mark next to File name extensions and Hidden items:
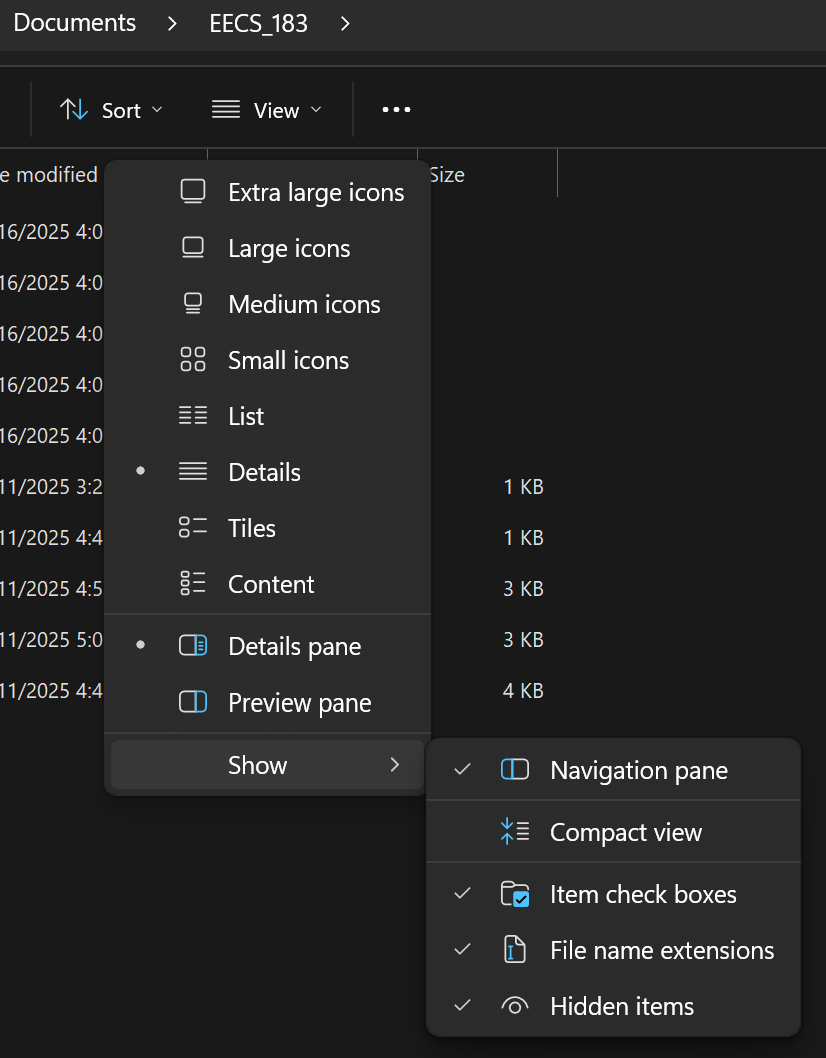
If you don’t have a checkbox by those options, you can enable them by clicking on each one. (You’ll have to go through the menu twice, once for each option you check.)
Windows
As a Windows user, you should skip the Mac section below and jump to the next tutorial, Setting Up Python.
4 Working with Files on Mac Computers
If you’re using Windows, don’t try to complete these Mac-only instructions. After completing the Windows section above, skip to the next tutorial, Setting Up Python.
4.1 Opening the Finder in the Documents Folder
Look at the collection of icons on the bottom of your screen. Locate the one for the Finder:  Click it, and you should see something similar to this, though you likely have a lot that will show up under “Recents”:
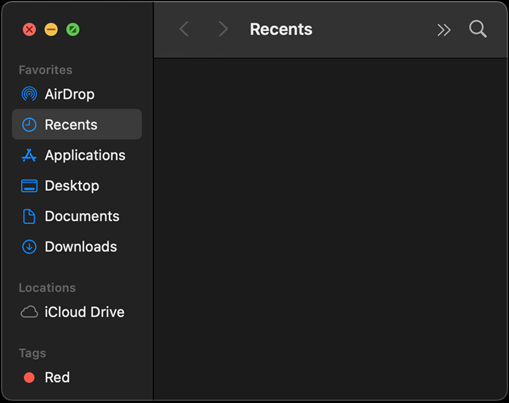
Click Documents on the left to go to that folder. You should see Documents at the top now:
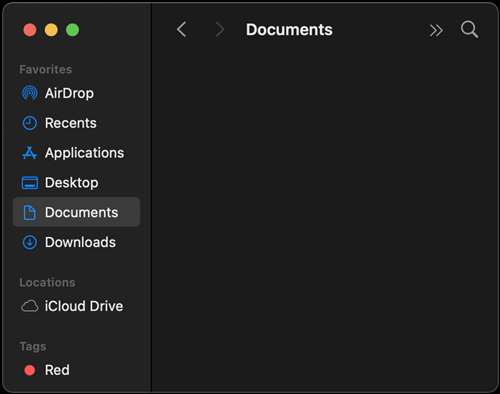
You may have many items in your Documents folder as well. That’s fine.
4.2 Getting the Setup Files
A zip file is a special type of file that contains one or more files bundled together in a compressed format. This makes it easier to download and share multiple files at once. We’ll be using a zip file to provide you with some setup files for this course.
Download EECS_183.zip by clicking this link.
Once your browser has finished downloading the EECS_183.zip file, it should be in your Downloads folder. Here’s how to find it:
4.3 Finding the Downloads Folder
- Open the Finder.
- In the
Favoritessection on the left, click onDownloads. - You should see a new
EECS_183folder in yourDownloadsfolder – with no zipper image on the icon, and no mention of.zip.
If you see EECS_183.zip instead of a folder, that’s perfectly fine. MacOS sometimes automatically extracts zip files, but apparently it hasn’t for you. Here’s how to make it happen:
- Double-click on the
EECS_183.zipfile in yourDownloadsfolder. - A program called
Archive Utilityshould automatically unzip the file. - A new folder (called
EECS_183) will appear in the same folder as the zip file. - Double-click on the new folder to view its contents.
The EECS_183 folder inside your Downloads folder has several folders inside to help you organize your files for this course. I’ve also included some “configuration” files that we’ll need soon.
4.4 Moving a Folder from Downloads to Documents
Do we want your EECS_183 folder to stay in your Downloads folder? No! That would be like getting a package delivered to your doorstep and then keeping the item on your doorstep forever. We need to “bring it inside” and put it in its right place. Let’s move the the EECS_183 folder from your Downloads folder to your Documents folder:
- Open two Finder windows: Open the first one as usual. Then click
File > New Finder Windowto open a second. - In one Finder window, navigate to your
Downloadsfolder. - In the other, navigate to your
Documentsfolder. - In the
Downloadswindow, click on theEECS_183folder. - Make a copy of the folder by pressing
⌘+C. - Click on the other Finder window (the one with your
Documentsfolder open). - We want to paste the folder here and also delete the original. We can do this with a single key combination:
⌘+⌥+V.
You should now see the EECS_183 folder in your Documents folder!
4.5 Making an Alias to Your EECS_183 Folder
Let’s make an alias (shortcut) to your EECS_183 folder so you can access it easily from your desktop. Control-click on the EECS_183 folder and choose Make Alias or Create Alias:
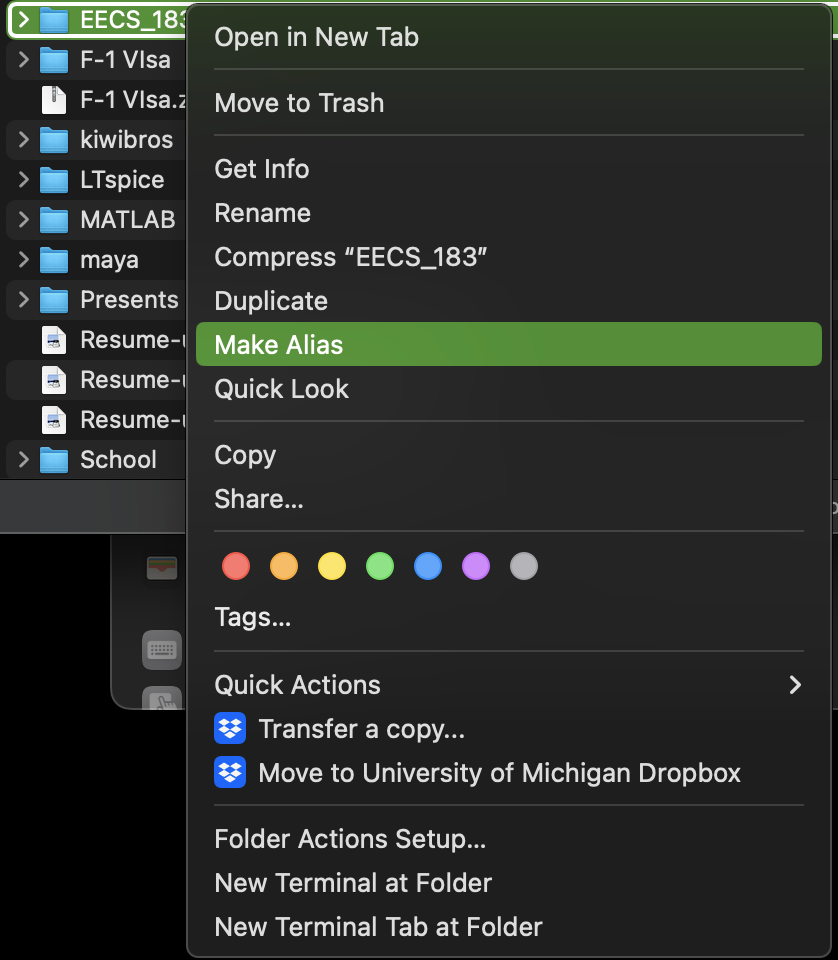
It should make a new item named EECS_183 alias, currently in your Documents folder.
Now we need to move that alias to your desktop. Click on the alias once so it is highlighted, then press ⌘+C to copy it. Then click on your desktop, and press ⌘+⌥+V to cut and paste it there.
From now on, you can double-click on that alias anytime to open your EECS_183 folder.
4.6 Changing the File Listing Style in Finder
Since we’ll be working with a lot of files, I strongly recommend that you change the style in which they are listed. In the Finder, in your EECS_183 folder, click on this icon, located in the top-middle of the Finder window:  . You should now see the files in a list, rather than a grid of icons. This will be useful for our work, as it will allow you to see more files at once, and also see more information about each file.
In addition, with the Finder open, go to Finder, Settings (or maybe Preferences), then click Advanced. Select Show all filename extensions so that the box is checked, and then close the Settings window. Now, you’ll be able to see each file’s “type” in the Finder. This will also be useful for our work.
5 Copyright and Intellectual Property Notice
© 2026 Steven Bogaerts. All rights reserved.
Materials for this assignment were developed with assistance from course staff, including Jungeun Seo.
All materials provided for this course, including but not limited to labs, projects, notes, and starter code, are the copyrighted intellectual property of the author(s).
- Student Use: These materials are provided solely for the educational use of students currently enrolled in this course at the University of Michigan - Ann Arbor. Students may not copy, reproduce, republish, or distribute these materials (in part or in full) to any public or private platform.
- External and Instructor Use: No part of these materials may be used, adapted, or distributed by external instructors or institutions without the explicit written permission of the author(s).
To request permission to use or adapt these materials for educational purposes, please contact the author(s).