(3) Setting Up VS Code
Due: Tuesday, September 8
In this document I’ll explain what a coding text editor is, why you need one, and how to set up VS Code as a text editor.
Jungeun Seo made some video walkthroughs for tutorials 1 - 3. You can find them in the Tutorial Videos folder on the Google Drive. You’re not required to watch them, but you may find them helpful in combination with the written instructions. (Note: Any URLs shown in the videos have now changed. Follow the links on this site instead.)
1 Don’t Use A Word Processor for Coding
When programming, it is essential that you use a text editor, not a word processor. The following are examples of word processors, meaning they are not suitable for programming:
- Microsoft Word
- Apple Pages
- Google Docs
- OpenOffice Writer
- LibreOffice Writer
To avoid problems that can bring you great frustration, never use a word processor, even temporarily, for anything involving code. This includes Microsoft Word, Apple Pages, Google Docs, etc.
If you want to know why a word processor is bad for programming, read the optional section at the end of this document.
2 Installing Visual Studio Code
An integrated development environment (IDE) is software that includes a special text editor and other tools for programming. Visual Studio Code (VS Code) is an IDE. It has many features that we’ll set up in a later tutorial. For now, we’ll just use its text editor feature.
We’re using Visual Studio Code (icon:  ), not “Visual Studio” (icon:
  ), which is actually a completely different IDE. Note that this is the opposite of what the C++ version of EECS 183 is using!
We’re not expecting that you’ve ever used an IDE before. If you have, though, please use VS Code for this course regardless of any prior experience with other IDEs.
Visit the Visual Studio Code download page(opens in new tab) in a new tab. You should see a big blue rectangular button to download VS Code for your operating system (e.g., Windows or Mac). Click it. (Ignore the smaller blue buttons.)
Expand the correct box below according to your operating system.
- Open your Downloads folder and find the file you downloaded. Mine is shown below; its version is 1.99.3. Your version number is likely higher than that, but otherwise it should look the same. Double-click on the file.
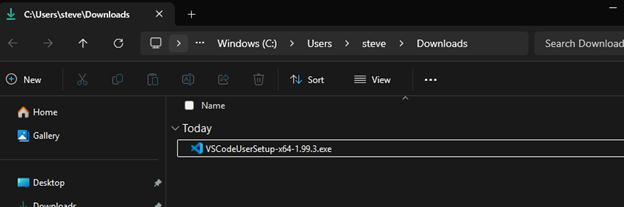
- In the window that pops up, choose “I accept the agreement” and click “Next”.
- The next window says “Select Destination Location”. Don’t change anything, and click “Next”.
- The next window says “Select Start Menu Folder”. Again, don’t change anything and click “Next”.
- The next window says “Select Additional Tasks”. Please check all boxes, as follows, and then click “Next”.
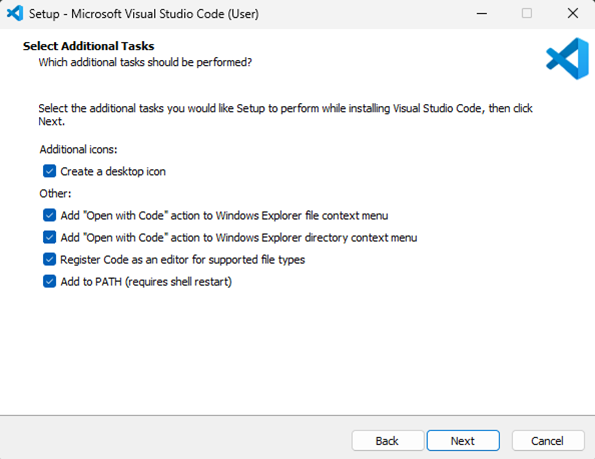
- The next window says “Ready to Install”. Click the “Install” button.
- When installation is finished, click the “Finish” button.
- VS Code will likely open automatically. Go ahead and close the VS Code window, though, so that we can practice the entire process from the beginning.
- If Safari asks you whether you want to allow downloads for code.visualstudio.com, say yes.
- Open the Finder, click on Downloads, and find the file you downloaded. It will have a name involving either “Visual Studio Code” or “VS Code”.
- If the file name ends with “.zip”, double-click it to “unzip” it, and then double-click the resulting file to run it.
- Otherwise, just double-click the file to run it.
- A window will pop up showing the
Visual Studio Codeicon on the left and a shortcut to yourApplicationsfolder on the right. We need to get theVisual Studio Codeicon into theApplicationsfolder to install it. Control-click on theVisual Studio Codeicon and choose “copy”. Then double-click on theApplicationsicon to open theApplicationsfolder. Click on theApplicationsfolder and hit⌘+Vto paste the “Visual Studio Code” icon into theApplicationsfolder. - Feel free to close the installer window now. Let’s also close the
Applicationsfolder, so that we can practice the process from scratch. - Now let’s open VS Code from the
Applicationsfolder, where it’s actually installed. Open the Finder, click “Applications” in the sidebar, and double-click “Visual Studio Code”: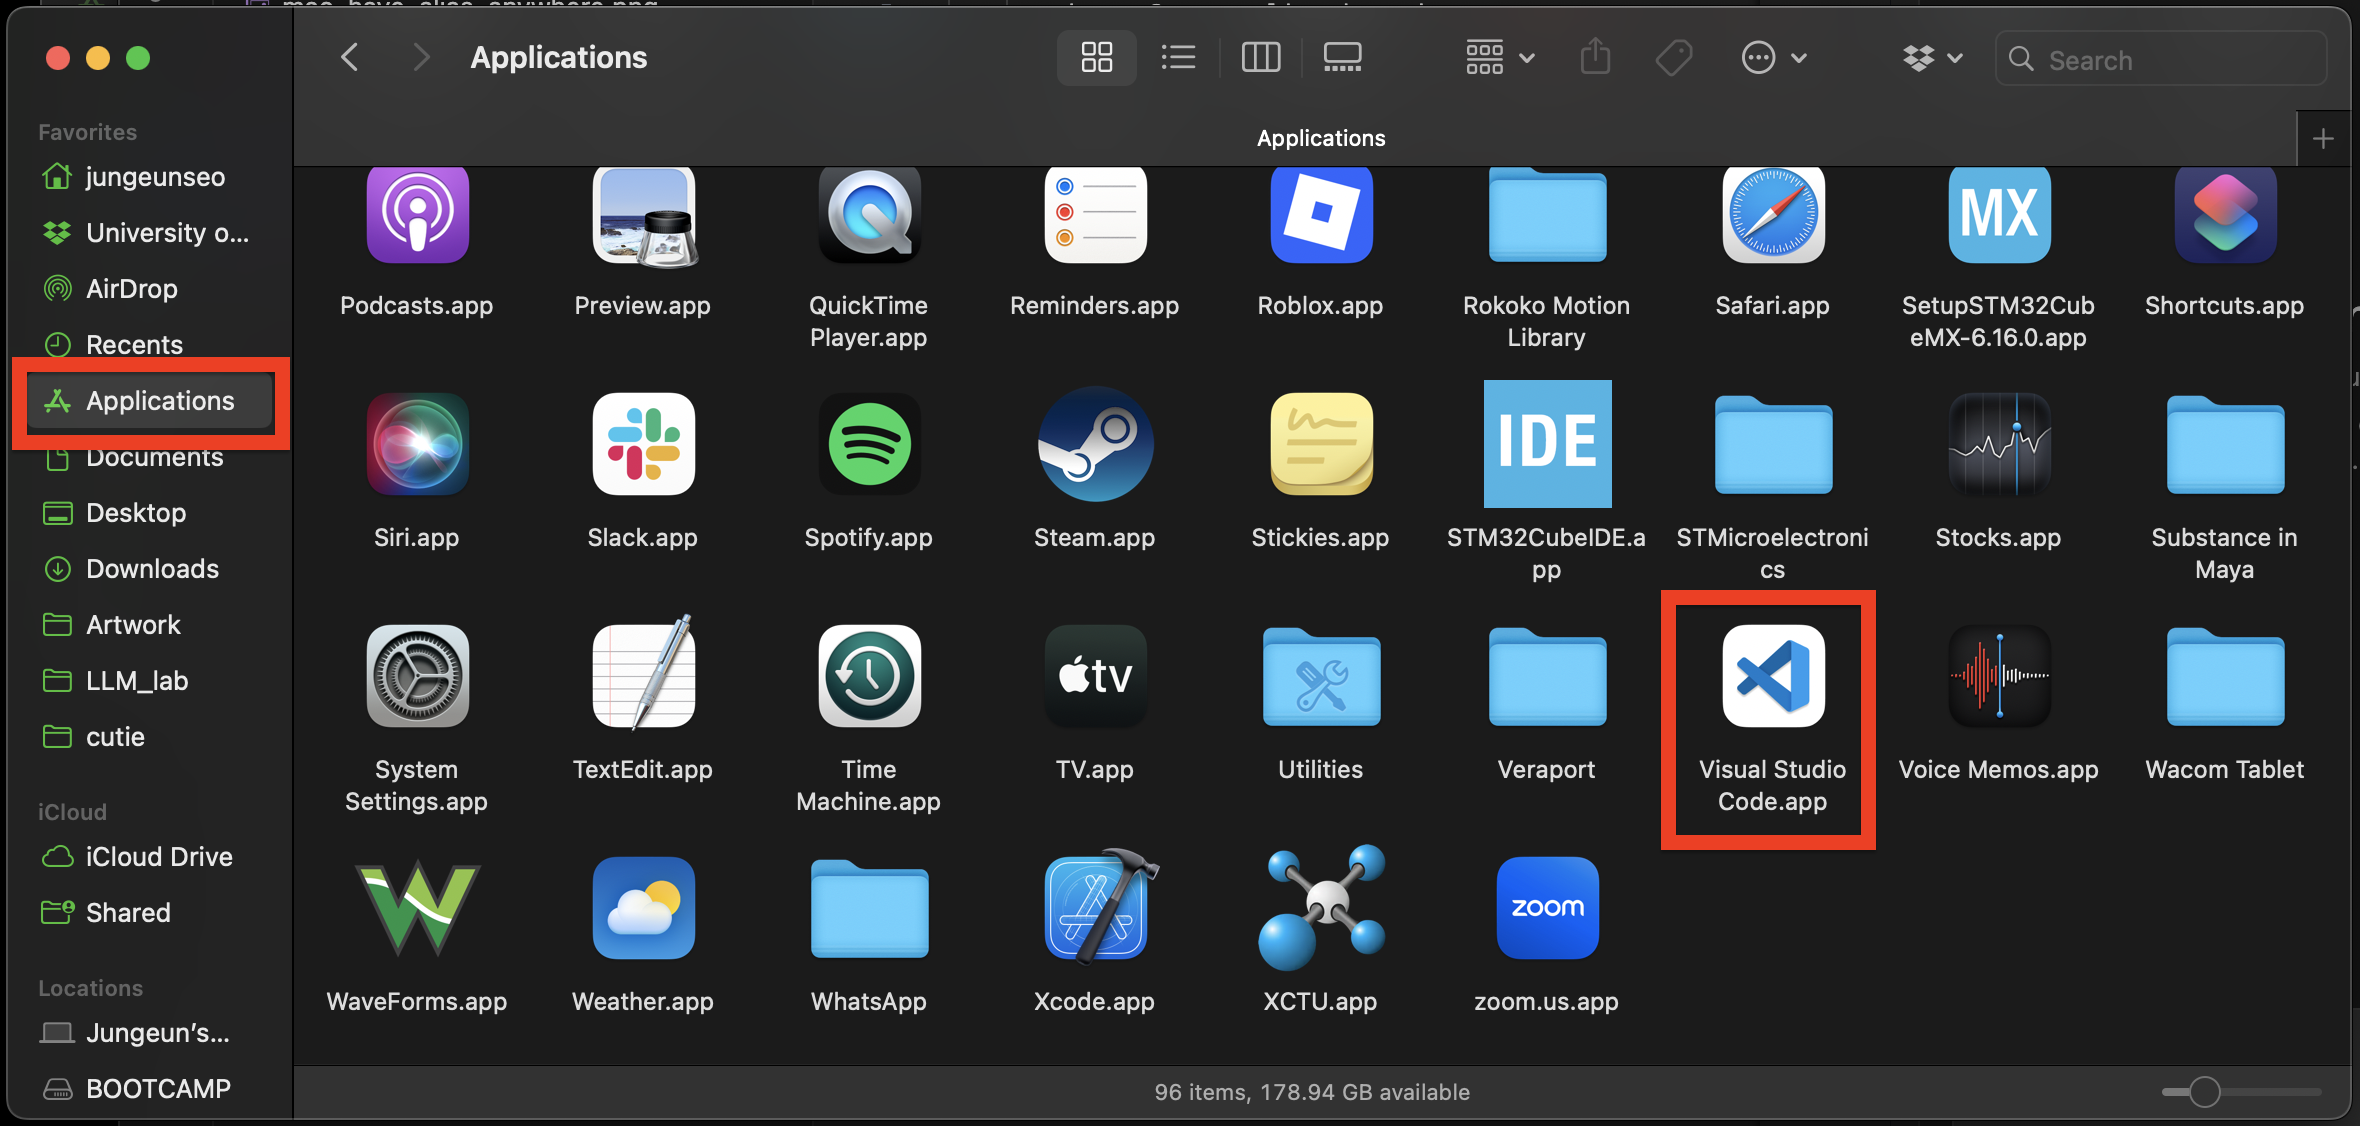
- You may get a warning that it’s a file downloaded from the internet - click the “Open” button.
- VS Code will open. If you’re asked about allowing access to a folder, go ahead and click “Allow”. You’ll likely see a welcome page of some kind. You can click the
Xin the top-right to close it - no need to step through it.
If at any time you notice a window asking you about installing git, feel free to just choose “cancel”. We don’t need this tool.
From now on, you can start VS Code from the Applications folder as in step 5 above, or more quickly using Spotlight: press ⌘+space, type “Visual Studio Code”, and press return. If you’d like a one-click icon, you can also drag “Visual Studio Code” from the Applications folder onto your Dock.
3 Opening VS Code and the EECS_183 Folder
Open VS Code as you practiced above. Choose File, Open folder, and navigate to your EECS_183 folder inside your Documents folder. Click on the EECS_183 folder to select it, and then click the Open or Select Folder button to open that folder in VS Code.
VS Code may ask Do you trust the authors of the files in this folder?. Click Yes, I trust the authors, because you are the author. I recommend you leave the checkbox unchecked – that is, do not select Trust the authors of all files in the parent folder 'Documents'.
Alternatively, you may see a message at the top indicating that VS Code is in Restricted Mode. Click the Manage link and click the Trust button in the pop-up window.
Next: You should then see something like this on the left (though your icons may be a little different - that’s ok):
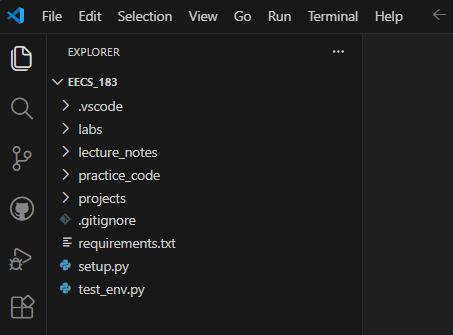
In particular, note that the EXPLORER area shows the contents of your EECS_183 folder.
Always start VS Code using the process above, for the entire semester, every single time! Specifically, we need to make sure you always have VS Code open in your EECS_183 folder. You should always see EECS_183 at the very top of the EXPLORER section, as in the image - not Documents, not labs, not labs/lab_3, not projects/p1, not anything else. You can work inside of those other folders, but EECS_183 should be at the very top.
This matters because some tools we need (the virtual environment .venv and the Flake8 style checker) are set up for the EECS_183 folder specifically. If you instead open a folder inside of EECS_183 (so that some subfolder is at the top of the EXPLORER section), then none of that setup will be active, and your code will fail to run correctly or won’t be checked for style at all.
As a safety net, if you ever do accidentally open a subfolder directly, I’ve hidden a reminder that’s meant to catch this. The first time it triggers for a given subfolder, VS Code will first show a popup message along these lines:
This workspace has tasks (EECS 183: Wrong Folder Warning) defined
(...) that can launch processes automatically when you open this
workspace. Do you want to allow automatic tasks to run in all
trusted workspaces?
Seeing this popup at all, in a folder you weren’t expecting it in, is itself a signal that something’s not right! If you click to allow it, you’ll then also see a big warning message appear in the TERMINAL area, spelling out the problem. If you click anything else, you won’t see that extra message, but the popup itself was already your clue. Either way, close the window and reopen the EECS_183 folder properly, as described above. (Since each subfolder is checked separately, you could see this popup more than once over the semester if you accidentally open a different wrong subfolder later on.)
It’s best not to rely on any of this, though. Just get in the habit of always opening the EECS_183 folder itself, as described above.
4 Installing Needed Extensions
In VS Code, extensions are tools that we can add to make it do something special for us, like give us hints about possible problems in our Python code. Let’s install the ones recommended for this course:
Click the Extensions icon in the left sidebar – it looks like four squares, one slightly separated from the others.
In the search bar at the top of the Extensions area, type
@recommended. You should see something like this: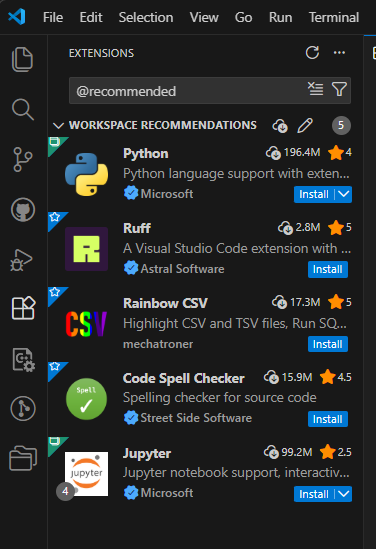
Click the blue
Installbutton for each of the extensions in theWorkspace Recommendationslist. (You might need to scroll down to see them all.) We only need the extensions in theWorkspace Recommendationssection. Ignore the extensions shown in theOther Recommendationssection below that. When you’re asked to trust the publishers of certain extensions, clickTrust Publishers & Install.
Sometimes extensions need to “restart” to finish installing. The easiest way to do this is to first close VS Code:
- Windows: Hit the
Xin the top-right corner. - Mac: Click the
Codemenu in the top-left corner of the screen, and chooseQuit Visual Studio Code.
Then open VS Code again. It should automatically open your EECS_183 folder again, but if not, open it manually.
5 Setting Up VS Code for Running Python Programs
Python runs via something called an interpreter. This is just a special program that knows how to read and execute Python code. There’s an interpreter that comes with the Python installation on your computer, but we want to set up VS Code to use a special virtual environment interpreter. In Python, a virtual environment is a clean slate where we can install special tools without affecting the main Python installation on your computer. It’s kind of like a private toolbox (the virtual environment) inside of a garage full of tools (your computer). We can gather whatever special tools we need and put them inside, to be used only when we open up that toolbox. Whatever we put in the toolbox won’t clutter up the rest of the garage or get mixed up with other tools outside of the toolbox. This helps avoid certain conflicts.
In the subsections below, we’ll set up VS Code to use a virtual environment. You should only need to do this once.
5.1 Opening a Python File (and Selecting the Python Interpreter If Necessary)
For the moment, let’s make sure that VS Code is using the main Python interpreter installed on your computer. To check this, we need to open a Python file in VS Code.
Look at the left side bar of VS Code. You should see icons arranged vertically like the image below. You may have other icons as well, or icons in a different order. That’s fine.

We need to make sure that the EXPLORER area is open. The EXPLORER icon looks like two papers on top of each other:  . Do you see in the image above that the
 EXPLORER icon is brighter? When I took that screenshot, the EXPLORER area was open, so the icon is highlighted. If your EXPLORER icon is not highlighted, click on it to highlight it and thus open the EXPLORER area. You should then see something like this:
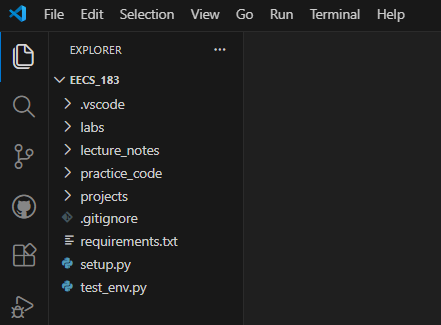
Also note that you can click the EXPLORER icon repeatedly to show/hide the EXPLORER area.
Double click on setup.py in the EXPLORER area of VS Code. You should see setup.py open in VS Code. You don’t have to understand the text in this file. You should see something like this:
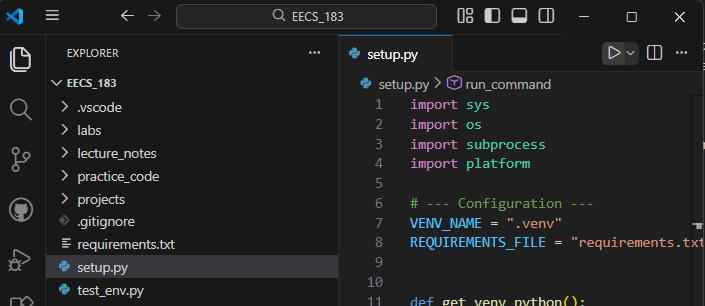
When you have a Python file (like setup.py) open, VS Code will usually automatically detect the Python interpreter installed on your computer. You can check that this is the case by looking in the lower-right corner of VS Code. You may see text indicating the version of your Python interpreter. For example, it might say Python 3.14.1 (64-bit) in the lower-right corner of VS Code. Your version number should be 3.14.something. If it’s less, expand the special note below.
If you don’t see any such text at all, first make sure that you have setup.py open in VS Code, that you’re looking at the text in that file. Then look for the interpreter version in the lower-right corner again.
Next, let’s select the interpreter manually to make sure it’s the right one:
- Type
ctrl+shift+P(Windows) or⌘+shift+P(Mac) to open the Command Palette. - Type “Python: Select Interpreter” and click on the corresponding option that appears:

You should then see something like the image below. If you’re reading this tutorial from top to bottom, you likely do not have a virtual environment (venv) set up yet. In that case, choose the “3.14.something” option. Click on that option.
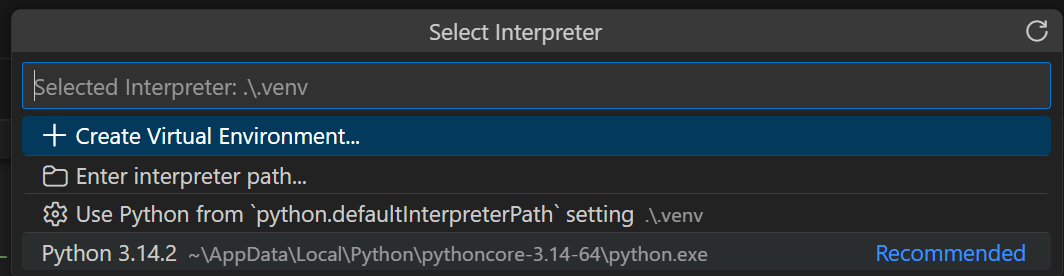
It may take several seconds for VS Code to switch to the selected interpreter. You may see a little “spinning circle” icon in the bottom right corner of VS Code. Once it’s done, you should see the 3.14.something version in the bottom right, and no warning triangle nor “Select Interpreter” message.
If you don’t see a version 3.14.something for Python, then please revisit the Python installation tutorial to make sure Python is installed correctly on your computer.
5.2 Running setup.py to Create a Virtual Environment
Next, we’ll make a single virtual environment to be used for this entire course, with a traditional name: .venv. We can do this by running the setup.py file. Open it in VS Code if you haven’t already. With setup.py open in VS Code, with you looking at the text, look for the right-pointing triangle in the upper-right corner of VS Code. It’s like a “play” button, as shown in the upper-right of the image below:
Hit that button to run setup.py. Wait a few seconds; in the TERMINAL area at the bottom of VS Code, you should see all of the text below appear gradually over several minutes:
--- EECS 183 Environment Setup ---

Creating virtual environment '.venv'...
[Creating .venv folder]... OK
[Upgrading pip & build tools]... OK
Installing libraries from requirements.txt  (this may take a minute)...
[Installing packages]... OK

==================================================
SUCCESS! Your environment is ready.
==================================================

IMPORTANT NEXT STEPS:
1. Restart VS Code (close and reopen).
2. Open a Python file (e.g. hello.py).
3. Check the bottom-right status bar:
   -> It should say '.venv (Python ...)'
4. TYPE SOME MESSY CODE:
   -> Type 'x=1' (no spaces). You should see a RED SQUIGGLE.
-> If you see the squiggle, the Style Checker is working!If you see a message asking if you want to run software from this untrusted publisher, then choose the option to trust the authors and run the software.
Try hitting the “play” button again. If that still doesn’t work, ask someone on staff for help.
Try hitting the “play” button again. If that still doesn’t work, read on in this box.
If you’re certain you’re hitting the correct button to run setup.py, but nothing is happening, the following may resolve your issue. If you’re uncertain how to accomplish the steps below, please reach out to someone on staff for help.
- Hit the windows key (looks like four squares). Type “python”. You should see your Python installation come up, like “Python 3.14 (64-bit)”, for example. Click “uninstall”.
- The settings app will open in Apps, Installed Apps. Scroll down to the “Python” section of the alphabetical list. For each item involving Python (e.g., “Python 3.14 (64-bit)”, “Python Install Manager”, “Python Launcher”, etc.), click the “…” button and choose “uninstall”.
- Go to the Python Downloads page(opens in new tab). This time, do not hit the main download button, but instead click the smaller link saying “or get the standalone installer for Python <version number>”.
- Run that installer. Be sure you select the option to add Python to your PATH. Also select every option involving the word “debug” when given the opportunity. Also change the installation location to a folder name reflecting your Python version with the dot removed (for example,
C:\PythonNNNwhereNNNrepresents a version number, or a similar name for whatever version of Python you’re installing. - Close VS Code, open it again, and redo the steps in the previous section.
Again, running setup.py may take several minutes. It’s done when you have all of the output shown above in the TERMINAL area at the bottom of VS Code. When it’s done, close VS Code:
- Windows: Hit the
Xin the top-right corner. - Mac: Click the
Codemenu in the top-left corner of the screen, and chooseQuit Visual Studio Code.
Then open it again and open your EECS_183 folder in VS Code (if not automatically open).
When you reopen VS Code, you might see an error message in the TERMINAL area at the bottom of VS Code saying something like:
File ...\.venv\Scripts\Activate.ps1 cannot be loaded because running scripts
is disabled on this system. For more information, see about_Execution_Policies
at https:/go.microsoft.com/fwlink/?LinkID=135170.
  + CategoryInfo          : SecurityError: (:) [], PSSecurityException
  + FullyQualifiedErrorId : UnauthorizedAccess
This just means Windows is trying to protect you from downloading random scripts from the internet. We need to tell Windows that it’s safe to run the scripts we just created. Do the following:
- Click the
Startbutton on your computer taskbar - the little Windows icon in the bottom middle or bottom left of your screen. - Type
Windows PowerShell. You should see something like the following:
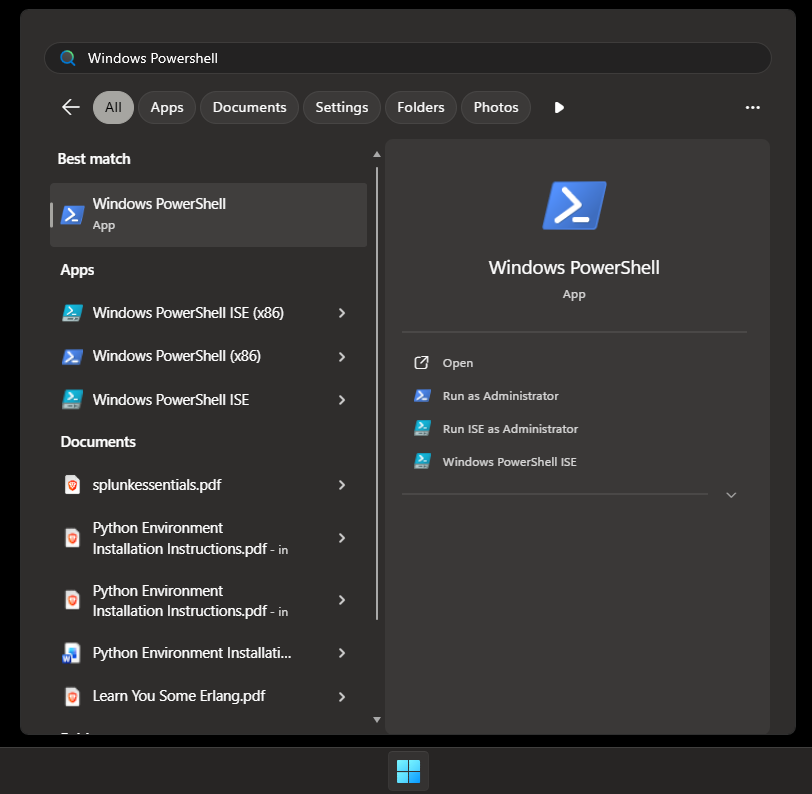
Right-click the “Windows PowerShell” app in the list on the left and select
Run as Administrator. (You must chooseRun as Administrator, not just open Windows PowerShell normally.)A window with the title “Windows Powershell” will open. Copy and paste the following command into it and then press
Enter:Set-ExecutionPolicy RemoteSigned
If you get an error mentioning Set-ExecutionPolicy : Access to the registry key, then PowerShell is not running as Administrator. Please close the PowerShell window and try again, making sure to right-click and choose Run as Administrator.
- You will be asked a question. Type the letter
Y(for “Yes”) and press Enter. - Let the script complete, and then close the PowerShell window.
- Close VS Code one last time, open it again, and open your
EECS_183folder in VS Code.
5.3 Selecting the Python Interpreter (with a venv)
Our virtual environment is hopefully set up now. Let’s check. Look in the bottom-right corner of VS Code again. Instead of something like Python 3.14 (64-bit), you should now see something like Python 3.14 (.venv) or perhaps .venv (3.14) – and again, your version number may be different but should be 3.14.something. (You’ll likely also see the .venv folder in the EXPLORER area in the top left, but I’m not talking about that here.) If you don’t see the .venv text in the bottom right, make sure you expand the box directly below.
First make sure that you have setup.py open in VS Code, that you’re looking at the text in that file. Then look for the venv text in the lower-right corner again.
If you still don’t see it, let’s select the virtual environment interpreter manually:
- Type
ctrl+shift+P(Windows) or⌘+shift+P(Mac) to open the Command Palette. - Type “Python: Select Interpreter” and click on the corresponding option that appears:
- Most likely the recommended option is the one with your Python version number and “(.venv)” at the end. For example, something like “Python 3.14 (.venv)”:
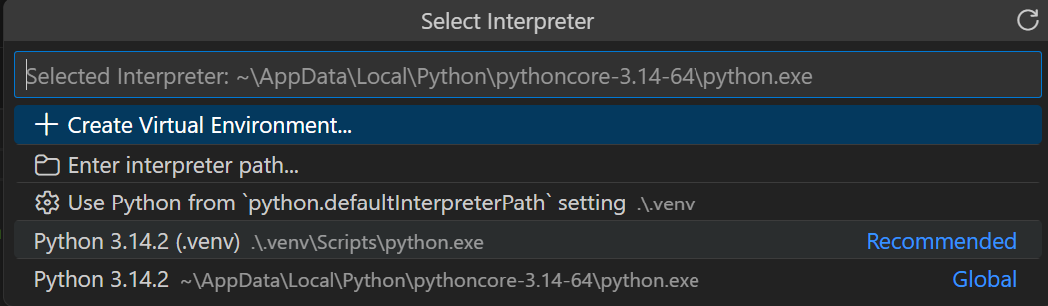
- After selecting the venv interpreter, it may take several seconds for VS Code to switch to the selected interpreter. You may see a little “spinning circle” icon in the bottom right corner of VS Code.
5.4 Verifying the Virtual Environment is Set Up Correctly
Let’s verify further that the virtual environment is set up correctly. In the EXPLORER section in the upper-left, find the test_env.py file – it’s in the base EECS_183 folder. Double-click test_env.py to open it in VS Code. Again, you don’t have to understand what this code is doing. With the test_env.py file open in VS Code, with you looking at the text in the file, hit the right-pointing triangle in the upper-right corner of VS Code to run it. The script may take up to 30 seconds or so to run, but eventually you should see output like the following:
Checking Python environment... (Python 3.14.0)
[OK]   Virtual Environment Active (C:\Users\Steve\Documents\EECS_183\.venv)
------------------------------------------------------------
[OK]    numpy                2.3.5
[OK]    pandas               2.3.3
[OK]    matplotlib           3.10.8
[OK]    seaborn              0.13.2
[OK]    scikit-learn         1.8.0
[OK]    jupyterlab           4.5.1
[OK]    imageio              2.37.2
[OK]    flake8               7.3.0
[OK]    pep8-naming          0.15.1
[OK]    flake8-bugbear       25.11.29
------------------------------------------------------------

SUCCESS! Your environment is ready for class.
It’s ok if your version numbers are different from those shown above.
If you get an error message about a KeyboardInterrupt, then try running test_env.py again. Sometimes the first time you run a Python file in a new virtual environment, it gets interrupted.
5.5 Turning On Auto Save
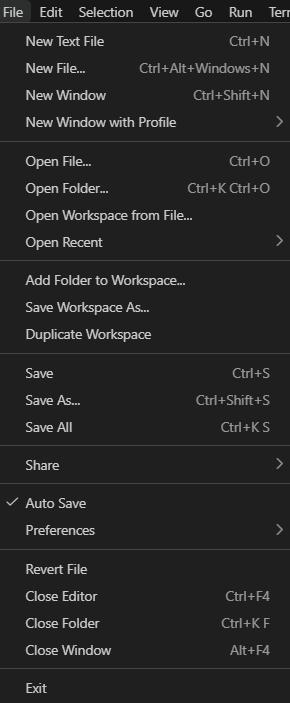
I recommend you turn on Auto Save, so that your edits are automatically saved periodically. Open the File menu. Find the Auto Save option. If the Auto Save option does not already have a check next to it, click it to add a check. It should then look like as shown below:
6 Making a New Python File in VS Code
Open your EECS_183 folder in VS Code if you don’t already have it open. Right-click (Windows) or control-click (Mac) on practice_code and choose New File. Name the file hello_again.py and then hit enter (Windows) or return (Mac). The .py means that the file we’re making is a Python code file.
Next, open hello_again.py by double-clicking on it in the EXPLORER area. You should see a blank file open. Paste in the following code:
print("Hello again!")Save the file (File menu, Save, or note the shortcut key combination shown there).
7 Running a Python File in VS Code
With VS Code open in the EECS_183 folder, and with the file you want to run open in VS Code, hit the right-pointing triangle in the upper-right corner of VS Code to run it.
For hello_again.py, you should see the output below in the TERMINAL area at the bottom of VS Code:
Hello again!You just ran a Python program!
7.1 If the Terminal Seems Stuck or Broken
Every so often, the TERMINAL area at the bottom of VS Code can act strangely - for example, it might stop printing output correctly, or hitting the run button might not seem to do anything at all anymore. If this happens, just make a new terminal window: In VS Code, go to the Terminal menu at the top, and choose New Terminal. A new terminal should open in the bottom area of VS Code. After a few seconds, the virtual environment .venv should be loaded in that terminal as well. (You should see (.venv) at the beginning of the command prompt in that terminal.)
Keep this in mind for the rest of the semester - it solves a large majority of “weird terminal” problems.
8 Finding Your Files From VS Code
Suppose you’re looking at a file in VS Code, and you’d like to open the File Explorer (Windows) or Finder (Mac) in the folder where that file exists. Here’s how to do that:
Look in the
Explorerarea in the top left corner of VS Code. If you don’t see it, tap the icon in the upper-left area first.
Find the file there that you’re interested in.
Follow the next step according to your operating system:
- Windows: Right-click on the file and choose
Reveal in File Explorer: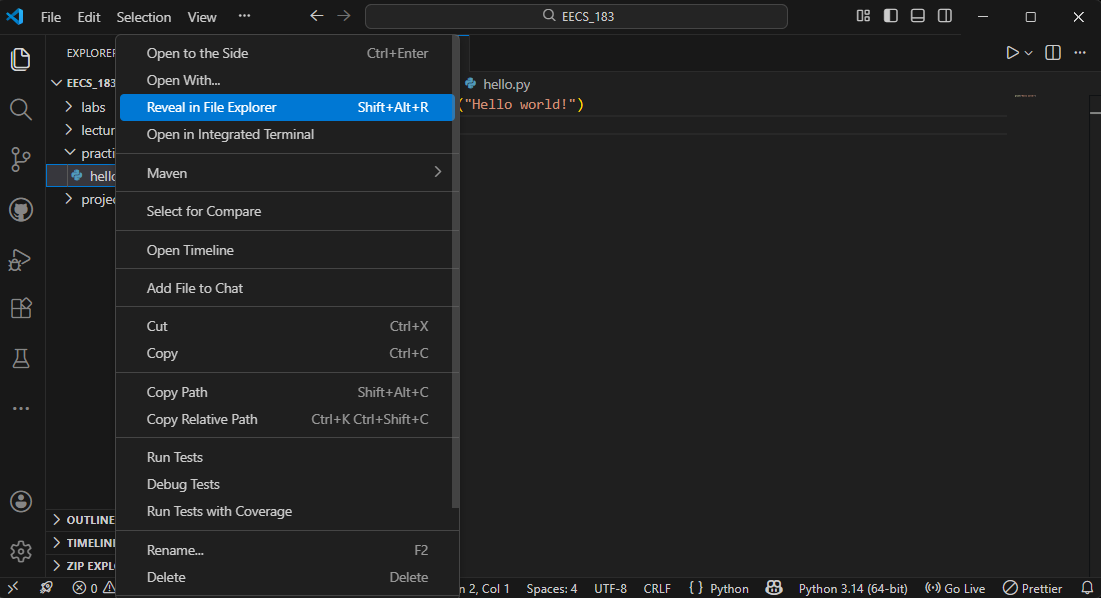
- Mac: Control-click on the file and choose
Reveal in Finder: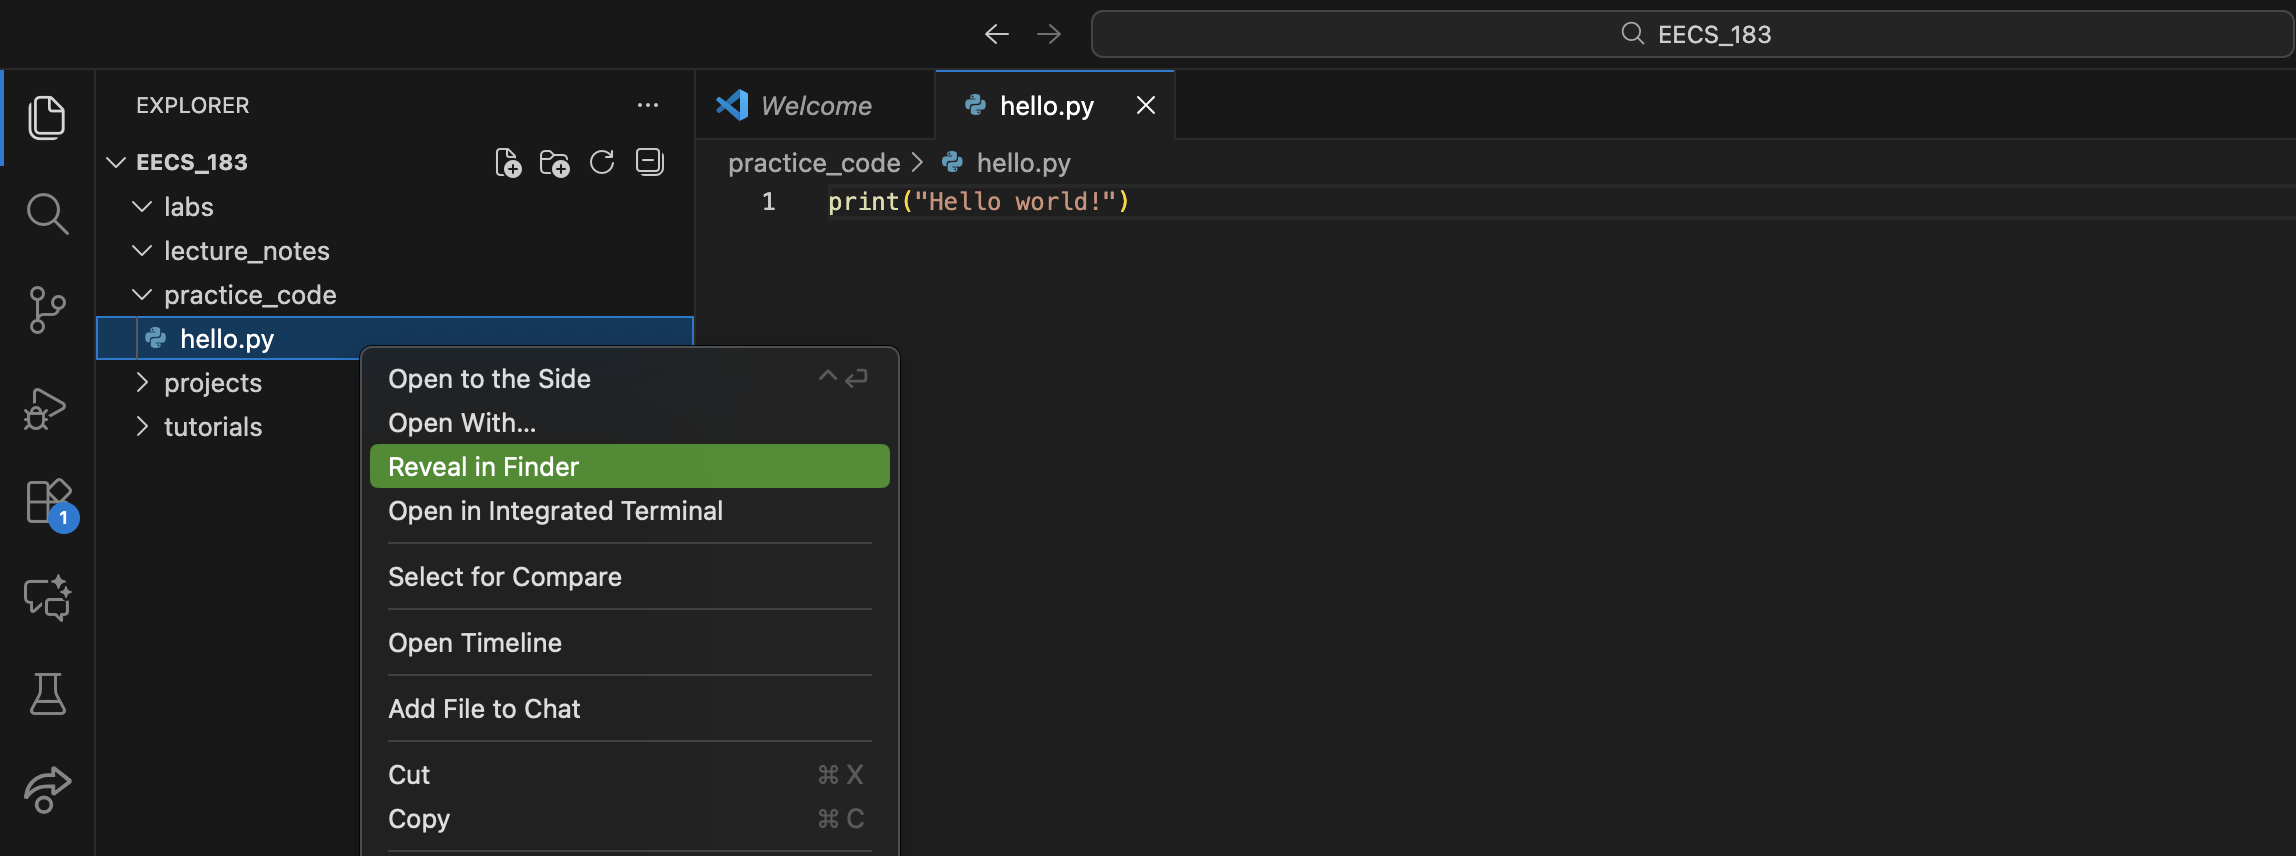
- Windows: Right-click on the file and choose
The File Explorer (Windows) or Finder (Mac) program should open in the folder in which that file exists.
9 Why Not Use a Word Processor? (Optional Reading)
You can skip this section if you want! It’s just some additional information about why the instructions above are important to follow.
Let’s start with some vocabulary:
- A character is a single symbol, like a letter, or a number, or %, @, etc.
- The ASCII characters are basically the characters you see on a U.S. computer keyboard. ASCII stands for American Standard Code for Information Interchange, and is pronounced “ASK-ee”.
- A plain text file is a file that contains only ASCII characters (and possibly others that we won’t worry about).
- Unlike a word processor, a text editor works only with plain text files.
You probably have a text editor on your computer already. For Macs, it’s called TextEdit. For Windows computers, it’s called Notepad. But these text editors are not designed specifically for programming, so the instructions above help you get Visual Studio Code installed.
Programs like Microsoft Word, Apple Pages, Google Docs, OpenOffice Writer, and LibreOffice Writer are not text editors; rather, they are word processors. A word processor can open a plain text file, but also works with specially-formatted documents.
Why is this distinction important? Consider the following bit of Python code, which we’ll call version A:
print("Hello world!")
Version A is how the code would appear if I typed it in a text editor. If I run a Python program containing only the command above, then the message Hello world! will be printed. (More on this in class!)
Suppose that instead of using a plain text editor, I typed my code in a word processor like Google Docs or Microsoft Word. In that case, I’d get what we’ll call version B:
print(“Hello world!”)
Would it surprise you to know that version B is not valid Python code? What’s the difference? Version A uses what are called straight quotes, or dumb quotes, while version B uses smart quotes. Most word processors will automatically make the smart quotes appear, knowing to curve the starting quotes differently from the ending quotes. It looks nice in English, but it’s not valid Python code. Python requires that I use straight quotes. So if I’m trying to type code in a word processor that automatically adds smart quotes, it’d get very annoying. I’d have to regularly go back and fix it. There are a few other examples like this that make word processors particularly problematic for coding.
10 Copyright and Intellectual Property Notice
© 2026 Steven Bogaerts. All rights reserved.
Materials for this assignment were developed with assistance from course staff, including Jungeun Seo.
All materials provided for this course, including but not limited to labs, projects, notes, and starter code, are the copyrighted intellectual property of the author(s).
- Student Use: These materials are provided solely for the educational use of students currently enrolled in this course at the University of Michigan - Ann Arbor. Students may not copy, reproduce, republish, or distribute these materials (in part or in full) to any public or private platform.
- External and Instructor Use: No part of these materials may be used, adapted, or distributed by external instructors or institutions without the explicit written permission of the author(s).
To request permission to use or adapt these materials for educational purposes, please contact the author(s).